As with any engine, the key to reliability is effective servicing.
When combustion occurs, blow by gases (the fumes which pass by the piston rings), accumulate within the engine casing.
In years gone by, these fumes would have been vented to atmosphere (if you were lucky there may have been a catch tank) but, emission rules mean that this is no longer an option.
As a result, engine manufacturers 'capture' these gases and feed them into the inlet to be burnt and expelled via the exhaust. This is all carried out by the engine breather setup.
In addition to the blow by gases, some oil vapour also passes through these breathers and this is a key contributor to the 'blocking' issue. This is made worse if the oil is old and 'past its best' as it takes on a tar like constituency.
So, onto the cleaning
To start, its recommended that you have the following items:
- Carb cleaner (or similar suitable cleaner)
- Breather bridge to plenum seal 1 off required - 90467543
- Breather bridge to throttle O ring 2 off required (4 off on extended plenum's) - 90500983
All of the above is cheap.
Remove the plenum as detailed in:
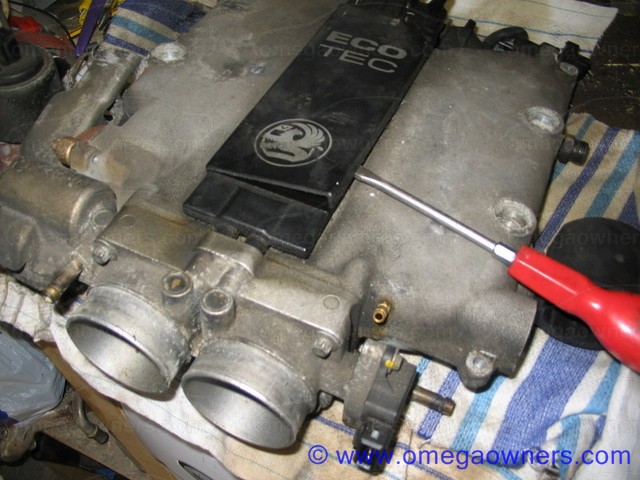
V6 Plenum RemovalUsing a flat blade screwdriver, ease the ecotec cover off so as to expose the torx retaining screw for the breather bridge assembly.

Remove the 4 TORX bolts and separate the throttle body from the plenum. Now remove the torx bolt holding the breather bridge to the plenum and lift it off. On later units with the extended plenum assembly, an additional short breather section is fitted, this should be removed and cleaned in the same way as the main breather bridge.

The next pic shows the three parts removed, the throttles at the front, the breather bridge to the left and the plenum in the center.

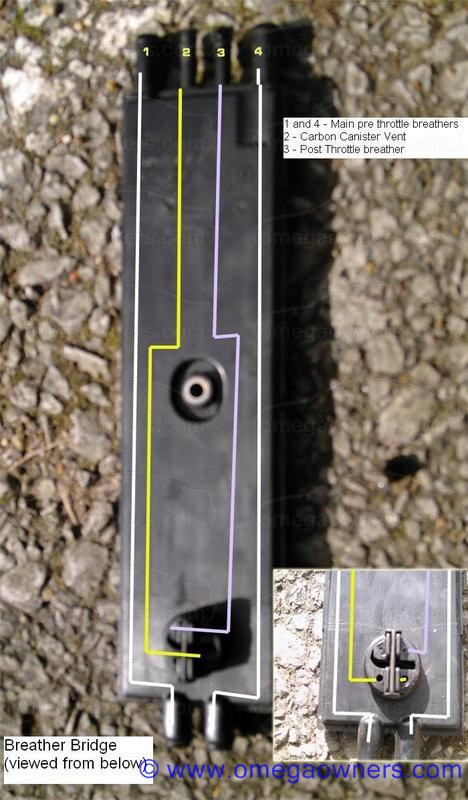
The black breather bridge needs a good shot of Carb cleaner and pay particular attention to the underside where there
should be 4 smallish holes visible.

Spend plenty of time cleaning the throttle assembly, paint stripper is excellent for removing the tough carbon off the rear of the butterflies as is Carb cleaner, pay close attention to the edges of the throttle butterflies.
This is also a good time to check the throttle butterflies, they should close pretty much fully shut (within machining tolerances anyway) but, don't over do it as they can stick shut.
Its not unknown for some mechanics to wind the throttle stop in to overcome stalling issues. This is a BAD idea as it means the idle is no longer under ECU control and the ECU can not effectively compensate for varying idle demands from air con, steering input and alternator loads.
So check the setting is adjusted so that the throttles are shut but they don't stick (if you wind out the throttle stop until you can just feel it stick, then wind it back in half a turn is about right!)
When these items are clean, fit the new seals to the breather bridge, re-assemble the plenum system ready to re-fit to the car as shown. Its worth putting a thin wipe of grease on the seals of the breather bridge to aid assembly.

And yes, that is the same plenum as in the first picture!
Remove the 2 breather tubes - 1 small one from the breather box, 1 large one that divides into two from the same breather box.
Next we need to clean the vent housing, this is mounted at the rear of the 1-3-5 head (driver's side in the UK) and has two connections located on the top face, one small and one large.
The smaller pipe (brass) has a very small hole in the center, this can be cleared with ideally a small drill (approx 1.6mm) or a suitable piece of wire.

Its also worth cleaning the area around the breather holes for completeness (and it makes it look nice!)
Next, the big pipe.

Again, a drill bit is recommended as this ensures that crud is removed (twist the drill as you go) rather than pushed into the breather box.
Do beware of squirting loads of Carb cleaner into the breather holes as this will have an adverse effect on the oil.

 Author
Topic: Cleaning the V6 crankcase breather setup (Read 26153 times)

